Sample Code - Google Map in Android Application
Location aware applications on android platform needs an intuitive way to present the location information.
Google provides a set of APIs to integrate the Google Map for development of android applications and bundled as Google APIs.
This post is focusing on Google Map object integration with android application.
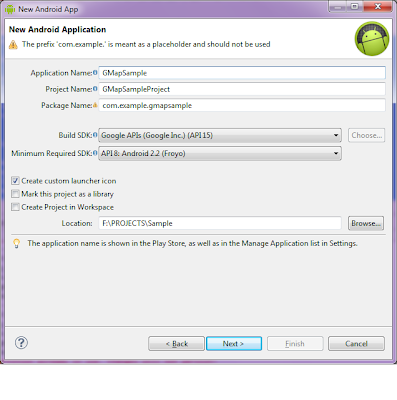
Create a Android application project "GMapSample" and open the default class file generated in the src directory as the main activity class. See here the project creation dialog
 |
| Create New Android Application Project Using Eclipse |
The following includes need to add in order to integrate the Google Map with your application.
import com.google.android.maps.GeoPoint;
import com.google.android.maps.MapActivity;
import com.google.android.maps.MapController;
import com.google.android.maps.MapView;
The MapActivity extends the basic Activity class of Android and provides the Google Map as the user interface.
In order to access the Google Map in your application you need to get a Application Key and define the Google Map object in your application XML layout.
 <com.google.android.maps.MapView
                 android:id="@+id/map_view"
                 android:layout_width="fill_parent"
                 android:layout_height="fill_parent"
                 android:apiKey="0HvaRYYCBNDap4SKY0HN-XXXXXXXXXXXXXXXX"
                 />
To get the API key for your application see the following link.
http://creativeandroidapps.blogspot.in/2012/07/get-application-key-for-google-map.html
Now replace the code of main activity class by following code
package com.example.gmapsample;

import android.os.Bundle;

import android.view.Menu;
import com.google.android.maps.GeoPoint;
import com.google.android.maps.MapActivity;
import com.google.android.maps.MapController;
import com.google.android.maps.MapView;


public class GMapSample extends MapActivity{

    private static final String TAG = "GMapSample";
    private MapView mapView;
    private MapController mapController;
    private static final int latitudeE6 = 17421306;
    private static final int longitudeE6 = 78457553;

    @Override
    public void onCreate(Bundle savedInstanceState) {
        super.onCreate(savedInstanceState);
        setContentView(R.layout.activity_gsample);
        mapView = (MapView) findViewById(R.id.map_view);   //get the map view resource added in XML file
        mapView.setBuiltInZoomControls(true);
        GeoPoint point = new GeoPoint(latitudeE6, longitudeE6); //defines the geo location
        mapController = mapView.getController(); //get the map controller
        mapController.animateTo(point); // show the location defined by geopoint
        mapController.setZoom(7);  //setting the map zoom level
        mapView.invalidate();  //redraw the map

    }

    @Override
    public boolean onCreateOptionsMenu(Menu menu) {
        getMenuInflater().inflate(R.menu.activity_gsample, menu);
        return true;
    }

    @Override
    protected boolean isRouteDisplayed() {
        return false;
    }
}
while compiling the application you will get some error because we have not added the use of google APIs in AndroidManifest.xml file of the application.
Add the following line in your application manifest file.
<uses-library android:name="com.google.android.maps" />
Add the following permissions also to manifest file.
<uses-permission android:name="android.permission.ACCESS_FINE_LOCATION"/>
<uses-permission android:name="android.permission.ACCESS_COARSE_LOCATION"/>
<uses-permission android:name="android.permission.INTERNET"/>
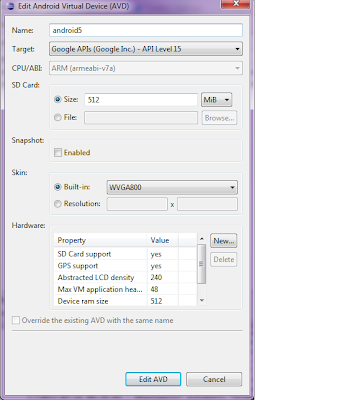
To run the application you need to define a AVD from the AVD Manager as follows
 |
| AVD for Google Map |
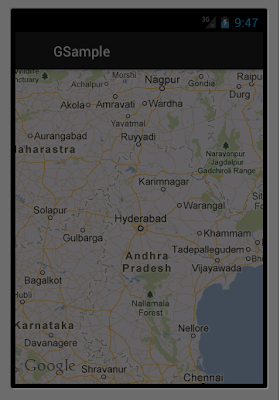
Running the application will give the following output.
 |
| Android Application with Google Map |
Thanks
Creative Android Apps
Hi....
ReplyDeleteI have seen your app in your blog. Its very useful for me. I implement your code and run the app in my emulator. at that time i get following error message.
Errors are: 1) "java.io.IOException: Server returned: 3", 2) "at android_maps_conflict_avoidance.com.google.googlenav.map.BaseTileRequest.readResponseData(BaseTileRequest.java:115)", 3) "at android_maps_conflict_avoidance.com.google.googlenav.map.MapService$MapTileRequest.readResponseData(MapService.java:1473)", 4) "at android_maps_conflict_avoidance.com.google.googlenav.datarequest.DataRequestDispatcher.processDataRequest(DataRequestDispatcher.java:1117)", 5) "at android_maps_conflict_avoidance.com.google.googlenav.datarequest.DataRequestDispatcher.serviceRequests(DataRequestDispatcher.java:994)", 6) "at android_maps_conflict_avoidance.com.google.googlenav.datarequest.DataRequestDispatcher$DispatcherServer.run(DataRequestDispatcher.java:1702)".
And only grid is display in emulator.
Please give me solution of it as soon as early.
Email is: sneha2011.jobs@gmail.com
This error normally comes when you use the signed key in your app and run that on the emulator.
ReplyDeleteUse the debug key while you run in emulator as described in post http://creativeandroidapps.blogspot.in/2012/07/get-application-key-for-google-map.html
Ofter all i get error as ..
ReplyDelete[2013-05-10 17:29:33 - ddmlib] An established connection was aborted by the software in your host machine
java.io.IOException: An established connection was aborted by the software in your host machine
at sun.nio.ch.SocketDispatcher.write0(Native Method)
at sun.nio.ch.SocketDispatcher.write(SocketDispatcher.java:33)
at sun.nio.ch.IOUtil.writeFromNativeBuffer(IOUtil.java:104)
at sun.nio.ch.IOUtil.write(IOUtil.java:75)
at sun.nio.ch.SocketChannelImpl.write(SocketChannelImpl.java:334)
at com.android.ddmlib.JdwpPacket.writeAndConsume(JdwpPacket.java:213)
at com.android.ddmlib.Client.sendAndConsume(Client.java:575)
at com.android.ddmlib.HandleHeap.sendREAQ(HandleHeap.java:348)
at com.android.ddmlib.Client.requestAllocationStatus(Client.java:421)
at com.android.ddmlib.DeviceMonitor.createClient(DeviceMonitor.java:837)
at com.android.ddmlib.DeviceMonitor.openClient(DeviceMonitor.java:805)
at com.android.ddmlib.DeviceMonitor.processIncomingJdwpData(DeviceMonitor.java:765)
at com.android.ddmlib.DeviceMonitor.deviceClientMonitorLoop(DeviceMonitor.java:652)
at com.android.ddmlib.DeviceMonitor.access$100(DeviceMonitor.java:44)
at com.android.ddmlib.DeviceMonitor$3.run(DeviceMonitor.java:580)
what s this?
This problem normally comes when you eclipse is not able to make connection with emulator.
DeleteTry closing the emulator and eclipse.
After the debug app I can occur following error.
ReplyDeletejava.io.IOException: Server returned: 3
ReplyDeleteGreat Article
Android Final Year Project Ideas for Computer Science
Project Centers in Chennai
I have been searching for a useful post like this on salesforce course details, it is highly helpful for me and I have a great experience with this Salesforce Training who are providing certification and job assistance. Salesforce training from Noida
ReplyDeleteThis comment has been removed by the author.
ReplyDeleteAntalya
ReplyDeleteTrabzon
Niğde
Maraş
Antep
İT1CE
kars
ReplyDeletesinop
sakarya
ankara
çorum
JNP0G
ABD2A
ReplyDeleteYalova Evden Eve Nakliyat
Binance Referans Kodu
Adıyaman Evden Eve Nakliyat
Bingöl Lojistik
Eryaman Fayans Ustası
Erzurum Şehirler Arası Nakliyat
Binance Güvenilir mi
Ordu Parça Eşya Taşıma
Kırşehir Şehir İçi Nakliyat
E4DE8
ReplyDeleteEdirne Şehir İçi Nakliyat
Aksaray Şehir İçi Nakliyat
Kripto Para Borsaları
Etlik Parke Ustası
Batman Şehirler Arası Nakliyat
Siirt Evden Eve Nakliyat
Eryaman Alkollü Mekanlar
Çerkezköy Oto Boya
İstanbul Lojistik
F50BC
ReplyDeleteBingöl Şehir İçi Nakliyat
Ağrı Lojistik
Cointiger Güvenilir mi
Yalova Lojistik
Zonguldak Parça Eşya Taşıma
Rize Şehir İçi Nakliyat
Amasya Şehir İçi Nakliyat
Muş Evden Eve Nakliyat
Keçiören Boya Ustası
A61AA
ReplyDeleteAnkara Parça Eşya Taşıma
Çerkezköy Parke Ustası
Düzce Şehir İçi Nakliyat
Balıkesir Şehir İçi Nakliyat
Altındağ Fayans Ustası
Adıyaman Lojistik
Çerkezköy Ekspertiz
Kocaeli Evden Eve Nakliyat
Kırklareli Evden Eve Nakliyat
FC9DC
ReplyDeletesohbet
nevşehir kadınlarla görüntülü sohbet
kütahya bedava sohbet chat odaları
seslı sohbet sıtelerı
görüntülü sohbet ücretsiz
manisa bedava sohbet uygulamaları
ardahan canlı sohbet siteleri ücretsiz
aydın ücretsiz sohbet odaları
telefonda canlı sohbet
DAF76
ReplyDeleteClubhouse Takipçi Hilesi
Kripto Para Madenciliği Siteleri
Kripto Para Nasıl Çıkarılır
Pi Network Coin Hangi Borsada
Telegram Görüntüleme Hilesi
Satoshi Coin Hangi Borsada
Binance Ne Zaman Kuruldu
Tiktok Beğeni Satın Al
Bitcoin Kazanma
8C521
ReplyDeleteellipal
onekey
roninchain
dappradar
shiba
yearn
chainlist
ledger wallet
arculus
1A538D5A32
ReplyDeleteinstagram takipci gercek
F7D4DC5AE0
ReplyDeleteig takipçi
beğeni satın al
telafili takipçi
gerçek takipçi
kaliteli takipçi