Search This Blog

Friday, 29 June 2012

Whats new in Jelly Belly Android 4.1 Release

Google launched the latest release of its mobile operating Android 4.1 Jelly Belly in Google I/O conference 2012.


See here the latest features of Jelly Belly

New Exciting User features

The exciting features for users in Jelly Belly (Android 4.1) 
  • Faster and more responsive user interface like buttery smooth interface.
  • Faster and better offline voice processing for search. Earlier versions will do that using the voice processing on cloud.
  • Google Now. Latest predictive platform for analyze about your interest and present whats happening right now for you. Catch the restaurants you walk , remember the game you like and much more to present the current happenings and automatically update to your phone.
  • Excellent notifications extended to pictures , paragraphs , and  action buttons for direct access to do things like reply to email, call somebody back, or vote up an article without opening a separate app to do that. Users can expand and collapse notifications, and even block notifications from apps they don’t want to hear from.

New Exciting Developer features

Every user feature provides and opportunity for the developers to create something new and exciting with Android OS. Jelly Belly provides good platform for developers to build creative apps around the new features
  • Google added new set of notification APIS and a priority and bigContentView field to Notifications, plus a number of styles such as BigTextStyle, BigPictureStyle, and InBoxStyle to make it easy for developers to provide richer notifications.
  • Widget improvements to properly manage the memory.
  • New set of APIs to improve the animations
  • New navigation setup enables the developers to quickly add the Up button. New APIs to better manage the back stack of your applications.
  • New set of accessibility APIs allow handicapped users to do gesture based traversal of all onscreen elements. Text reading is supported by word, line, or paragraph.
  • As a security feature a new permission ( READ_EXTERNAL_STORAGE ) that will be required in a future release for apps that want to read the contents of the SD card. Up to now, anybody could read the SD card. It’s not enforced in JellyBean unless you turn on a special developer option. Google strongly encourages all developers that read from the SD card to include this permission now.
  • JellyBean shortens the audio latency ( time between when you take an action like pressing a button and when you can hear a sound caused by that action such a click or a gunshot in a game) . 
  • New Anti-piracy APIs for developers to encrypt the applications with a device-specific key so they can’t simply be copied and uploaded to the Internet. 
  • New and better support for native components in NDK now you can debug the C/C++ components together with your JAVA code.
All this new APIs have been added to the Android Support library, which is used by developers to support older versions of Android. This is really a good news for developers to enjoy all the versions of Android OS.
Enjoy developing creative apps with latest Android OS Jelly Bean and if you have any question please put your comments I will be happy to share.
Thursday, 28 June 2012

Redefine UI using Ice cream sandwich

Android 4.0 (Ice cream sandwich ) provides new features to define the UI which completely redefine the applications.

Layout Enhancement : A new Grid Layout for android applications which improve performance by supporting flatter view hierarchies that are faster to layout and render. New set of UI elements which can be control in layout based on their visual appearance.

OpenGL ES Texture View : A new Texture View to directly integrate the texture views in UI hierarchy. Texture View provides a more powerful method to render the user interface on surface and allow developers  to create previews of video, game scene, embedded camera preview and animated videos.

Hardware accelerated 2d Drawing: Android 4.0 provides the hardware accelerated 2d drawing feature which allows developers to add high resolution UI for devices and allow lots of transformation and real life effects to build in application.

Android 4.0 also redefines the input methods to enhance the interaction with the Android 4.0 powered devices.

Stylus Input : Android 4.0 includes full support for stylus input events, including tilt and distance axes, pressure, and related motion event properties. To help applications distinguish motion events from different sources, the platform adds distinct tool types for stylus, finger, mouse, and eraser. (Stylus is a digital writing tool)


Multi Button & Hover event Support: For multi button pointing devices Android 4.0 added the distinct primary, secondary and back and forward buttons. For better navigation Android added events enter and exit on hover.


New Text Service with integrated spellchecker : Android 4.0 allows applications to query available text services such as dictionaries and spell checkers for word suggestions, corrections, and similar data. The text services are external to the active IME, so developers can create and distribute dictionaries and suggestion engines that plug into the platform. When an application receives results from a text service — for example, word suggestions — it can display them in a dedicated suggestion popup window directly inside the text view, rather than relying on the IME to display them.


Enjoy developing new app experience using Ice cream Sandwich. 


Did you enjoyed the post? Please provide your feedback.


Powerful media function in Ice cream sandwich


Powerful media functions 
Android 4.0 added the powerful media functions to enrich the applications.

Low level streaming multimedia : Android 4.0 enables the direct path for low level media streaming with a new set of native API based on khronos OpenMAX AL 1.0.1 (standard for media library portability). Low level streaming allows the applications to keep complete control over the media before passing to the presentation layer.

New Camera Functions: Android 4.0 enables the new camera functions by which apps can take better resolution images even during the vedio capture.

Transform the images and videos : A set of high-performance transformation filters let developers apply rich effects to any image passed as an OpenGL ES 2.0 texture. Developers can adjust color levels and brightness, change backgrounds, sharpen, crop, rotate, add lens distortion, and apply other effects

Audio Remote Control : A new set APIs for audio remote control for media applications. The media applications can add the audio remote functions to control the functions using the audio remote events.

New media codec and containers : Android 4.0 adds support for additional media types and containers to give developers access to the formats they need. For high-quality compressed images, the media framework adds support for WebP content. For video, the framework now supports streaming VP8 content. For streaming multimedia, the framework supports HTTP Live streaming protocol version 3 and encoding of ADTS-contained AAC content. Additionally, developers can now use Matroska containers for Vorbis and VP8 content.

New Ways to Share using Ice Cream Sandwich

The Android 4.0 (Ice Cream Sandwich) provides a common and unified UI for phones and tablets including lots of new UI elements.

The new and exciting sharing and connecting features of Android 4.0 provides the developers more flexibility and creativity in developing apps. The new and exciting sharing and connecting features of Android 4.0 are

New APIs for Sharing

New social, calender and voice-mail APIs to share the contents across the applications and social providers.

Social APIs : A shared provider for social content where any app or social network can put the raw contents and other apps or networks can get the social contents. The shared provider provides the APIs for contacts, photos, stream items and profile data. The sharing is based on the user's permission. 

Calender APIs : A shared calender provider where any app can add and manage the data as dates, events, attendees, alerts and reminders.

Voice Mail APIs:  A shared voice mail provider provides the unified way to manage the voice messages from any applications.

Android Beam: Redefining the sharing using the NFC (Near Field Communication) which allows the user's to quickly share the contents by just tapping the phones together. When  the devices are in range of few 
centimeters the device creates an NFC connection and allow the sharing.

Shared Action Bar : SharedActionProvider for apps to add the sharing functionality to action bar of the application. You can simply add ShareActionProvider to the menu and set an intent that describes the desired sharing action.

News ways of connectivity

Android 4.0 provides the new ways to connect and discover the devices and provides new opportunities for developers to build more informative apps.

Wi-Fi Direct : A new framework allows the developers to connect the near by devices over a high performance , secure and reliable connection. No internet connection or hotspot is needed.

Bluetooth HDP (Health Device Profile) : A new set of framework API,by which applications can use Bluetooth to discover nearby devices, establish reliable or streaming data channels, and manage data transmission. Applications can supply any IEEE 11073 Manager to retrieve and interpret health data from Continua-certified devices such as heart-rate monitors, blood meters, thermometers, and scales.


Wednesday, 27 June 2012

Basics About the Grid View

Android provides a two dimensional grid view to display the items in a scrollable grid.The grid items will automatically inserted into the layout using the list adapter.

Add the following lines in the layout file (layout file can be locate in res directory). open the main.xml and add the following lines

<LinearLayout xmlns:android="http://schemas.android.com/apk/res/android"
    android:orientation="vertical"
    android:layout_width="fill_parent"
    android:layout_height="fill_parent"> 
 <TextView
        android:text="CreativeAndroidApps - This is a GridView Example"
        android:layout_width="wrap_content"
        android:layout_height="wrap_content" />
 <GridView
    android:id="@+id/grid"
    android:layout_width="fill_parent"
    android:layout_height="fill_parent"
    android:numColumns="2"
    android:columnWidth="100px"
    android:stretchMode="columnWidth"
    android:gravity="center"/>
 </LinearLayout>


Now create the following activity class

package com.example.creativeapps;

import android.app.Activity;
import android.os.Bundle;
import android.widget.ArrayAdapter;
import android.widget.GridView;

public class CreativelayoutsActivity extends Activity 
{
     GridView myGrid;
     String[] listContent = {
                "January",
                "February",
                 "March",
                 "April",
                 "May",
                 "June",
                 "July",
                 "August",
                 "September",
                 "October",
                 "November",
                 "December"
     };
    @Override
    public void onCreate(Bundle savedInstanceState) {
        super.onCreate(savedInstanceState);
        
        setContentView(R.layout.main);
        myGrid = (GridView)findViewById(R.id.grid);
        //create the array adapter for the grid view  
        ArrayAdapter<String> adapter
         = new ArrayAdapter<String>(this,
          android.R.layout.simple_list_item_1,
          listContent);
          myGrid.setAdapter(adapter);
     }
 
}

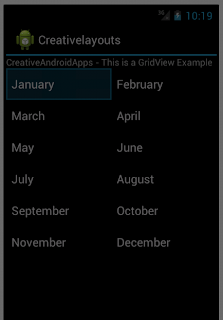
Run the sample and you will get an output as grid view as follows

Android Grid View
Android Grid View Example


Using ListView with ArrayAdapter in Android

To understand the list view you can create a simple list view in layout file.
(locate the layout file in res directory) and the following lines in the main.xml

<LinearLayout xmlns:android="http://schemas.android.com/apk/res/android"
    android:orientation="vertical"
    android:layout_width="fill_parent"
    android:layout_height="fill_parent"> 
 <TextView
        android:text="CreativeAndroidApps - This is a ListView Example"
        android:layout_width="wrap_content"
        android:layout_height="wrap_content" />
 <ListView
         android:id="@+id/list"
         android:layout_width="fill_parent"
         android:layout_height="wrap_content" />
 </LinearLayout>

Now create a array of months to populate in Listview

ListView myList;
     String[] listContent = {
                "January",
                "February",
                 "March",
                 "April",
                 "May",
                 "June",
                 "July",
                 "August",
                 "September",
                 "October",
                 "November",
                 "December"
     };

@Override
    public void onCreate(Bundle savedInstanceState) {
        super.onCreate(savedInstanceState);
        
        setContentView(R.layout.main);
        myList = (ListView)findViewById(R.id.list);
        //create the array adapter for the list view  
        ArrayAdapter<String> adapter
         = new ArrayAdapter<String>(this,
          android.R.layout.simple_list_item_1,
          listContent);
          myList.setAdapter(adapter);
     }

Now run the app and see the list view of months.

Android List
Android ListView Example


Tuesday, 26 June 2012

Using the List View in Android


Android provides the list view as a standard view to display the group of scrollable items. The list view is bounded with an Adapter which provides an array of items or database query to populate the list view.


The standard way to list the data in list view is to use the cursor loader which provides an asynchronous method to load the list view from query object.


See the example below using the list view bounded with simple cursor adapter which reads the contacts data. (You can use the list view using cursor loader in android 3.0 and with backward support with 1.6)


(Note : add the following permission to android manifest file


<uses-permission android:name="android.permission.READ_CONTACTS" /> )


public class ListViewExample extends ListActivity
        implements LoaderManager.LoaderCallbacks<Cursor> {

    // Create the Simple Adapter Object
    SimpleCursorAdapter mAdapter;

    // These are the Contacts rows that we will retrieve
    static final String[] DataObj = new String[] {ContactsContract.Data._ID,
            ContactsContract.Data.DISPLAY_NAME};

    // This is the select criteria
    static final String Query = "((" + 
            ContactsContract.Data.DISPLAY_NAME + " NOTNULL) AND (" +
            ContactsContract.Data.DISPLAY_NAME + " != '' ))";

    @Override
    protected void onCreate(Bundle savedInstanceState) {
        super.onCreate(savedInstanceState);

        // Create a progress bar to display while the list loads
        ProgressBar progressBar = new ProgressBar(this);
        progressBar.setLayoutParams(new LayoutParams(LayoutParams.WRAP_CONTENT,
                LayoutParams.WRAP_CONTENT, Gravity.CENTER));
        progressBar.setIndeterminate(true);
        getListView().setEmptyView(progressBar);

        // Must add the progress bar to the root of the layout
        ViewGroup root = (ViewGroup) findViewById(android.R.id.content);
        root.addView(progressBar);

        // For the cursor adapter, specify which columns go into which views
        String[] fromColumns = {ContactsContract.Data.DISPLAY_NAME};
        int[] toViews = {android.R.id.text1}; // The TextView in simple_list_item_1

        // Create an empty adapter we will use to display the loaded data.
        // We pass null for the cursor, then update it in onLoadFinished()
        mAdapter = new SimpleCursorAdapter(this, 
                android.R.layout.simple_list_item_1, null,
                fromColumns, toViews, 0);
        setListAdapter(mAdapter);

        // Prepare the loader.  Either re-connect with an existing one,
        // or start a new one.
        getLoaderManager().initLoader(0, null, this);
    }

    // Called when a new Loader needs to be created
    public Loader<Cursor> onCreateLoader(int id, Bundle args) {
        // Now create and return a CursorLoader that will take care of
        // creating a Cursor for the data being displayed.
        return new CursorLoader(this, ContactsContract.Data.CONTENT_URI,
                DataObj, Query, null, null);
    }

    // Called when a previously created loader has finished loading
    public void onLoadFinished(Loader<Cursor> loader, Cursor data) {
        // Swap the new cursor in.  (The framework will take care of closing the
        // old cursor once we return.)
        mAdapter.swapCursor(data);
    }

    // Called when a previously created loader is reset, making the data unavailable
    public void onLoaderReset(Loader<Cursor> loader) {
        // This is called when the last Cursor provided to onLoadFinished()
        // above is about to be closed.  We need to make sure we are no
        // longer using it.
        mAdapter.swapCursor(null);
    }

    @Override 
    public void onListItemClick(ListView l, View v, int position, long id) {
        // Do something when a list item is clicked
    }
}

Monday, 25 June 2012

Using Fragments in Android

You can use the fragments to display the multiple user-interface panes in single screen. The fragments can be create by creating a subclass of the Fragment class.

You can use the standard class also to create your own fragments. The standard fragment classes are as follows

  • DialogFragment - displays the floating dialog window
  • ListFragment - display the list of items managed by the adapter
  • PreferencesFragment - displays a hierarchy of objects (settings)
The fragment class provide the similar methods like activity to implement its lifecycle. The methods which you must implement while designing the fragment are as follows

OnCreate() - The system calls this when the system is creating the fragment.

OnCreateView() - The system calls this when first time the fragment is drawing its user interface.

OnPause() - The system calls this when user is leaving the fragment and the fragment is moving to back-stack.

For Example the SampleFragment extending the Fragment class. The onCreateView method provides the UI for the fragment. 
public static class SampleFragment extends Fragment {
    @Override
    public View onCreateView(LayoutInflater inflater, ViewGroup container,
                             Bundle savedInstanceState) {
        // Inflate the layout for this fragment
        return inflater.inflate(R.layout.sample_fragment, container, false);
    }
}

The sample_fragment.xml is the layout file for the sample fragment.

Now you can use this fragment in your activity using the fragment transactions. To create or start a fragment transaction you need to get the FragmentManager of your activity while activity is running

FragmentManager fragmentManager = getFragmentManager()
FragmentTransaction fragmentTransaction = fragmentManager.beginTransaction();

Now you can add the fragment to the container of the ViewGroup.

SampleFragment fragment = new SampleFragment();
fragmentTransaction.add(R.id.fragment_container, fragment);
fragmentTransaction.commit();

Basics about fragments - Android

Android introduces the fragments in version 3.0 (API Level 11) to provide intuitive user interface design for large screen size of tablets.

A fragment is a sub-module of the activity to represent a portion of the user interface of the activity. You can combine multiple fragments in a single activity to build multi-pane user interface. The fragments are generalized components can be use in multiple activities

Fragments has its own life cycle and input events and can add and remove from the activity while the activity is running. The fragment will always included in an activity and also known as sub-activity.
The life cycle of the fragment is directly affected by the lifecycle of the activity hosting the fragment.

All the fragment transactions will be move to the activity back-stack and the back button will be used to invoke the fragment transaction from the back stack.

By dividing the activity layout in multiple fragments, you can design a user interface with multiple views in one screen instead of using multiple activities.

For Example a activity could be divide into two fragments left as a list fragment and right as the details fragment to better navigate the contents in single screen. You should keep the design fragment design modular and reusable and avoid the manipulation of one fragment from another, this way you have a greater flexibility to reuse the fragments.


Permissions required to access Location Manager


To access the location manager you need to declare the proper permissions in the application manifest file.
If you will not define this permissions then the application will get a security exception (SecurityException) at run-time.

The permission depends on the methods used from LocationManager. The LocationManager in android.location package provide the two location provider methods.

1) GPS Providers
2) Network Location Based Providers

The ACCESS_COARSE_LOCATION permission is required if you will use the network location based providers.

The more accurate GPS Providers need the ACCESS_FINE_LOCATION permission.

defining the ACCESS_FINE_LOCATION permission implies ACCESS_COARSE_LOCATION permission automatically

The network based location providers need the internet access permissions also.

Example - Network based location providers permissions in manifest file
<uses-permission android:name="android.permission.ACCESS_COARSE_LOCATION" />
<uses-permission android:name="android.permission.INTERNET" />

Sunday, 24 June 2012

Implementing the location aware apps on Android


Android provide the platform to build the location aware applications. You can implement the location based application using the android.location package classes.

The core of the android location framework is Location Manager. You can request the location manager service from system using the getSystemService API call.

See below the implementation for the activity requesting the location of the user from GPS location provider.

//create the object for the location manager
private LocationManager mLocationManager;
//create the object for the GPS location
private Location gpsLocation;
//frequency for location determination
private static final int TEN_SECONDS = 10000;
//distance for location determination
private static final int TEN_METERS = 10;

// Get a reference to the LocationManager object.
mLocationManager = (LocationManager) getSystemService(Context.LOCATION_SERVICE);

Now implement a check for the location services are enabled on the device or not.

    protected void onStart() {
        super.onStart();

        // Check if the GPS setting is currently enabled on the device.
        // This check should be implement in onStart Method as the system calls this method every time the activity resume
        LocationManager locationManager =
                (LocationManager) getSystemService(Context.LOCATION_SERVICE);
        final boolean gpsProvider = locationManager.isProviderEnabled(LocationManager.GPS_PROVIDER);

        if (!gpsProvider) {
            // Create an alert dialog to request user to enable the location services
            new EnableGpsDialogFragment().show(getSupportFragmentManager(), "enableGpsDialog");
        }
    }


Now add the following method to call the settings interface using the intents (Start another activity)

  // Method to launch Settings interface
    private void enableLocationSettings() {
        Intent settingsIntent = new Intent(Settings.ACTION_LOCATION_SOURCE_SETTINGS);
        startActivity(settingsIntent);
    }

Now implement the dialog interface for user to choose the option to enable the location services

/**
     * Dialog to prompt users to enable GPS on the device.
     */
    private class EnableGpsDialogFragment extends DialogFragment {

        @Override
        public Dialog onCreateDialog(Bundle savedInstanceState) {
            return new AlertDialog.Builder(getActivity())
                    .setTitle(R.string.enable_gps)
                    .setMessage(R.string.enable_gps_dialog)
                    .setPositiveButton(R.string.enable_gps, new DialogInterface.OnClickListener() {
                        @Override
                        public void onClick(DialogInterface dialog, int which) {
                            enableLocationSettings();
                        }
                    })
                    .create();
        }
    }

Now request the location provider from location manager

requestUpdatesFromProvider(
                    LocationManager.GPS_PROVIDER, R.string.not_support_gps);

Call this method upon the activity resume by the user.

 @Override
    protected void onResume() {
        super.onResume();
        gpsLocation = requestUpdatesFromProvider();
    }

Now implement the above method to register the provider

private Location requestUpdatesFromProvider(final String provider, final int errorResId) {
        Location location = null;
        if (mLocationManager.isProviderEnabled(provider)) {
            mLocationManager.requestLocationUpdates(provider, TEN_SECONDS, TEN_METERS, listener);
            location = mLocationManager.getLastKnownLocation(provider);
        } else {
            Toast.makeText(this, errorResId, Toast.LENGTH_LONG).show();
        }
        return location;
    }

Now create the location listener with the handler methods

private final LocationListener listener = new LocationListener() {

        @Override
        public void onLocationChanged(Location location) {
            // A new location update is received.  Do something useful with it.  Update the UI with
            // here you will get the location update which you can update in UI
            
        }

        @Override
        public void onProviderDisabled(String provider) {
        }

        @Override
        public void onProviderEnabled(String provider) {
        }

        @Override
        public void onStatusChanged(String provider, int status, Bundle extras) {
        }
    };

Make sure that you will remove the location updates from activity on onStop method

  // Stop receiving location updates whenever the Activity becomes invisible.
    @Override
    protected void onStop() {
        super.onStop();
        mLocationManager.removeUpdates(listener);
    }

Create your first app to get your location and enjoy with Android.


Challenges in determining the user location in Android Location Apps


Android location framework provide the multiple location providers to determine the user location based on his device.

The android frameworks classify the location based providers in two categories
1) GPS Based Location Providers
2) Network Location Based Providers

The determination of the user location is not easy and has many challenges due to the mobile nature of the user device.

The three main issues with user position determination are as follows

1) Multiple sources for location determination - The GPS, Cell-ID, Wi-Fi (Network Locations) provide the user locations in different timeframe and different accuracy. The different methods of determining the user location consumes a good amount of battery power. The different methods and there selection depends on the requirement of the application and provides challenge to create a balance between the accuracy, time and performance.

2) User Movement - The user location changes frequently which needs a frequent updates for the user location. The application which needs the exact location of the user device needs to use multiple providers to determine the users exact location.

3) Varying AccuracyLocation estimates coming from each location source are not consistent in their accuracy. A location obtained 10 seconds ago from one source might be more accurate than the newest location from another or same source.

All the above points create challenges for applications to determine the accurate position of the user device within the time range and minimal use of the battery.

The application sensitive to the exact location of the user position needs more methods to implement the accurate user position.


Location Aware Android Apps

Location aware android platform provide a rich set of features you can build in your application which depends on the location information.

Android platform provides the android.location package to create the location aware applications.

The core component of the Android Location package is LocationManager which provides the APIs to determine the device location.Location Manager is the system service provides an internal layer to device to determine the location awareness.

Location Manager instance could not be created directly as this is a system services and you could get an instance of the location manager using the getSystemService API. The API return a handle to the location service.


Once your application has a LocationManager, your application can do following things
  • Query for the list of all LocationProviders for the last known user location.
  • Register/unregister for periodic updates of the user's current location from a location provider (specified either by criteria or name).
  • Register/unregister for a given Intent to be fired if the device comes within a given proximity (specified by radius in meters) of a given lat/long.
There are two types of location providers you can use to determine the user position.

1) GPS Based Provider - GPS based provider is more accurate but limited to outdoors. GPS Providers consumes more power and take a bit of time to determine the user location.

2) Network Location Based Provider- Android Network Location based provider determines the user location based on the mobile tower location, Wi-Fi Signals, so this works for outdoors and indoors.
The response time is fast and the overall battery power consumption is low.

You can use one or multiple providers to determine the location of the user and provide lot of smart informative apps for the user.


How to query the data from Content Provider?


The applications access the data from the other applications content providers using the content resolver object. Content Resolver runs as a client object and allow the CRUD (Create, Retrieve,Update and Delete) operations.

Content Provider Provides an abstract layer to query the data as table and hide the internal repository of application data. The Content Providers automatically handles the inter-process communication.

Note : To access the applications content provider the client application must need to specify the permissions in manifest file.

The ContentResolver object has methods identical to the ContentProvider and when resolver calls a method the identical name method will be invoked in ContentProvider Object.

The ContentResolver object ha a query method to pass a request to the ContentProvider Object.

// Queries the user dictionary and returns results
mCursor = getContentResolver().query(
    UserDictionary.Words.CONTENT_URI,   // The content URI of the words table
    mProjection,                        // The columns to return for each row
    mSelectionClause                    // Selection criteria
    mSelectionArgs,                     // Selection criteria
    mSortOrder);                        // The sort order for the returned rows
See the argument list for the query method


query() argumentSELECT keyword/parameterDescription
UriFROM table_nameUri defines the content provider table_name
projectioncol,col,col,...projection is an array of columns for select list
selectionWHERE col =valueselection specifies the filter criteria for selecting  rows.
selectionArgs
sortOrderORDER BY col,col,...sortOrder specifies the order in which rows appear in the returned Cursor.


Monday, 18 June 2012

Basics About Content Providers


Basic about content providers


Content Providers in android is used to manage and share data between applications in secure manner. Content Providers manage access to the structured set of data. The data is encapsulated and shared a standard interface that connects data in one process with code running in another process.
The application access the data is known as consumer application and the application providing the data is known as provider application.
The consumer application connects to provider application as client using ContentResolver object. The ContentResolver communicates with the provider object, an instance of a class that implements ContentProvider.
The Provider object receive data from the client and perform actions on that data and send a result to the Resolver Object of consumer application.
If you want to share your data to other applications then only you need to implement a content provider.
Android provide various content providers in a package android.provider.
The various type of audio, video and contact data is shared with content providers in android
Content Providers : Content Provider is used to publish data from the application.Content Provider represents the data in a form of a table just like a table in relational databases. The row defines a set of data (instance of data provider collects from applications) and column defines the individual piece of the data.
For example, one of the built-in providers in the Android platform is the user dictionary, which stores the spellings of non-standard words that the user wants to keep.
Example of user dictionary table
wordapp idfrequencylocale_ID
mapreduceuser1100en_US1
precompileruser14200fr_FR2
appletuser2225fr_CA3
constuser1255pt_BR4
intuser5100en_UK5
 For this provider, the _ID column will be treated as a "primary key" column which is automatically manage by the provider.
Content Resolver : Content Resolver is used to access data from the application. Content Resolver provides the methods to create, retrieve, update and delete (CRUD).
The content provider and content resolver performs a secure inter-process communication to share and access the data among different applications.